*** Part 1: The 1st Stage Liquid Cooler ***
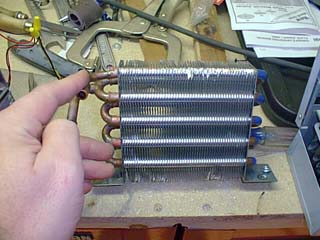
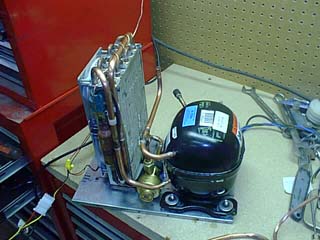
After reading much material on the "phase change", freon based cooling systems, I had learned that the efficiency of the system was controlled heavily by the size and thermal properties of the condenser. I went to local A/C supply stores, A/C shops and looked everywhere on the Internet for a small, compact condenser coil. I found this unit at a recycle shop for a little refrigeration unit. ( If you look at the Kryo Tech and Asetek units, this look like the same unit).
Now that I had a clear understanding of what would make my system really cook, it was apparent that this was a do-it-yourself package. I went to a local A/C shop and bought a used condenser coil that had a punctured tube for twenty bucks. Out comes the Dremel with a cut off wheel and wallah, the size needed.
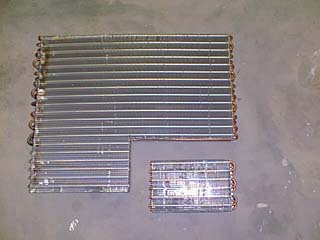
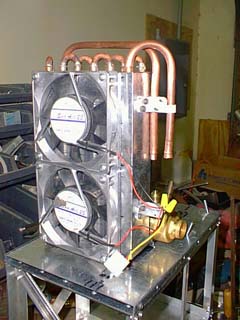
This little puppy gave me three rows of 6 tubes each. Assembly was straight forward, a little solder, some copper tubing, a couple of pieces of sheet metal and two high CFM fans (bought at electronics clearing house for $2 ea.)
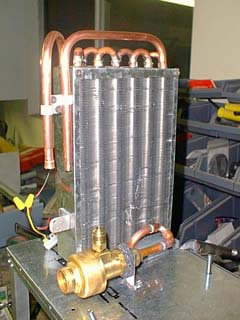
One of the hurdles encountered with the use of these little refrigeration units is that the way they control temperature is by cycling the unit on and off. For my application this would cause an unacceptable level of fluctuation in temperature at the exchanger. Once I achieved the desired cooling temp, the unit would cycle off and the processor would add heat faster than the unit could cycle back on and recover the temp gain. Plus with the processors sitting idle, the heat generated would be substantially less than at full load. What to do? As you can see from the two pictures, there is a brass gadget attached. This is an adjustable hot gas bypass valve. It allows me to control the "efficiency" of the condenser, and keep the final temp constant without cycling the compressor. It also doesn't let the temp continue to drop under no load until the evaporator "freezes-up".
Now for the compressor, after a shit load of research, I found the Tecumseh AZ0349Y compressor (1/20hp for a single CPU [220W@-40C evaporator] and 1/10hp for a dual [440W@-40C evaporator]). This little baby ($122.00 Retail-aahh!) is designed as a constant duty, non-cyclic, R-134a unit, capable of displacing 1655BTU/hr (610W@-35C evaporator) with the right condenser - evaporator combination.
Now after all the material I had read about the efficiency of the R-134a freon, I thought about converting the unit to R-12. That was a mistake. The oil is not compatible, the seals are not compatible and you need an act of congress to get the R12. Then I found http://www.epatest.com/qwikboost-press-release.html Quik-Boost® additive. This increased the efficiency and cooling capacity by 10% to 15%, making it a little more equal to R-12.
The next decision was the evaporator. Do I couple direct to the compressor and allow the "phase change" to occur at the processor or cool a liquid and circulate it though the exchangers? Again, after all the research and reading, I determined that I would build a small chamber to cool a 40/60 mixture of glycol and water. I decided this because the compact size of the exchanger on the processor would again lead to fluctuation in temp if I had the refrigerant "phase change" at the processor. Surface area, volume, material all effected the decision. The use of a liquid, along with the fact there would be a reserve in the tank, would result in more stable temperature at the exchanger and would allow immediate boot of the machine because you didn't have to wait for the compressor to "wind-up" and start dropping the temp. The water naturally had a "reserve" of heat storage capacity until the compressor became efficient. With the fact that size was a restriction, I went on to fabricate the evaporator and coolant chamber. Using 20 gauge sheet metal and solder, I built the container.
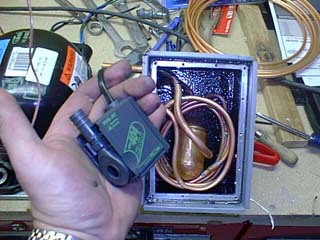
After soldering the sheet metal together, I lined the inside with about 50mils of liquid urethane for that "extra" protection. The evaporator coil was constructed out of 1/4" copper tubing and I added a large copper "bulb" to increase the efficiency of the evaporator. In my hand is the Aqua-Jet 404 aquarium pump. ($12.45 at the local per store). Capable of 108GPH, and as you can see, very small, it was placed in that little area above the evaporator coil. This little chamber held the evaporator, pump and 1.2 quarts of coolant. Since we would be looking a -25C on the coolant, it had to be insulated.
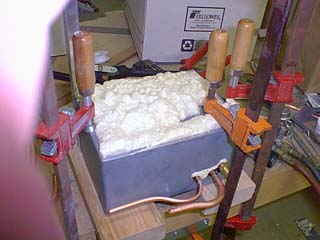
I built another 20 gauge enclosure and filled the area between them with high density foam insulation. Everything was mounted and refrigerant piping completed.
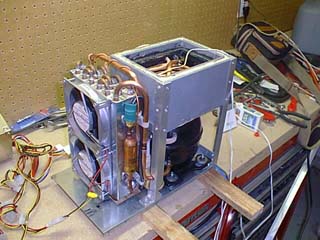
Initial testing began. Not knowing what the capacity of freon was, it was trial and error for adding freon. After a half a dozen fills, the most efficient temperature was achieved at 9 oz. of R-134a and 1 oz. of Quik-Boost®. I measured the amperage draw of the compressor and compared it to the temp at the evaporator. I also measured the temperature of the compressor itself. Finally the set temp at the evaporator was -24C. This required 145W of power and the compressor never went above 54C.
On to Part 2
Back to Home Page